
Bm dev bears! 🐻
The launch of Berachain’s Artio Testnet has made waves within the community. Artio’s hype among users remains unmatched and it being built on a strong implementing of Proof-of-Liquidity consensus mechanism, just adds to the excitement developers and teams have to start getting deployed on the testnet!
Shortly after the launch of Berachain’s Artio Testnet, Particle Network launched Smart Wallet-as-a-Service support which allows developers building on Berachain to immediately begin prototyping applications that natively leverage social logins for the creation and management of both EOAs and associated smart accounts (currently SimpleAccount implementations) on Berachain.
This article is a joint effort with Tabasco from Particle Network’s DevRel team, all the help during the time of formulating the dApp template from scratch is widely appreciated! 🤝 🐻
Pre-requisites
- Node js > 20 and latest npm. Please follow this guide if needed: https://docs.npmjs.com/downloading-and-installing-node-js-and-npm.
- IDEs like VScode, Replit etc.
- $BERA: Berachain’s native gas token, which will be required by newly created wallet which will be used in the demo. (https://artio.faucet.berachain.com)
- $HONEY: Berachain’s native stablecoin, obtained via the official Berachain Dex/ Bex. (https://artio.bex.berachain.com)
- Access to the Particle Network developer dashboard. (https://dashboard.particle.network/)
Social Logins with Particle Auth Core
🤔 Why Social Logins?
Social based logins have proven to be a step-closer towards the narrative of “easier web3 onboarding”, especially for users that have experienced majorly web2 apps.
By leveraging Social Login, your users can easily authenticate themselves using their preferred social media accounts, simplifying the onboarding process. As we know to interact with Web3 dApps we require having a wallet. This is where Particle Networks bridges the gap by enables a user to obtain a web3 wallet address associated with the user’s account once they have been successfully been authenticated.
🛠️ What are we building?
This tutorial would be focusing on building a smart WaaS-enabled application on Berachain Artio Testnet through Particle Auth Core and Particle's AA SDK. This application will replicate the functionality found within the embedded dApp shown above.
We won’t be focusing on frontend in this guide but the guide does share frontend code. In-all we would be:
- Initiating a social login (in this example, through Google or X, alongside a general authentication modal).
- Assigning a SimpleAccount to the resulting EOA (generated via a social login).
- Executing a gasless burn transaction (of 0.001 $BERA)
- Executing a burn of 1 $HONEY, Berachain’s native stablecoin.
By the end of this, you’ll ideally have a good idea of how to implement Particle Auth Core within your project on Berachain or simply get a social login template on Berachain Testnet, leveraging the structure and utilization flow showcased here.
Building Base for Your Application
- Initialize your project: Create a new React-typescript application using Vite.
npm create vite@latest berachain-particleTest -- --react-ts;

# Expected Output
# Need to install the following packages:
# create-vite@5.2.1
# Ok to proceed? (y) y
# ✔ Package name: … berachain-particletest
# ✔ Select a framework: › React
# ✔ Select a variant: › TypeScript

# Scaffolding project in /Users/dethebera/BeraWork/berachain-particle-testterminal/berachain-particleTest...

# Done. Now run:

#   cd berachain-particleTest
#   npm install
#   npm run dev
cd berachain-particleTest;
npm intall;
# Expected Output
# added 219 packages, and audited 220 packages in 8s
# 41 packages are looking for funding
# run `npm fund` for details
# found 0 vulnerabilities2. Install dependencies for this project
npm install @types/events antd buffer react-dom

# Expected Output
# added 71 packages, and audited 291 packages in 5s

# 45 packages are looking for funding
#   run `npm fund` for details

# found 0 vulnerabilities
npm i ethers@5.7.2
# Expected Output
# added 44 packages, and audited 335 packages in 4s
# 76 packages are looking for funding
# run `npm fund` for details
# found 0 vulnerabilities3. Install Particle Libraries: To begin building this demo and explore the process of implementing Particle Auth Core, you’ll need to install a few key libraries that we’ll be using for configuration. Specifically, you’ll need to install:
@particle-network/auth-core-modal, the central SDK for implementing Particle Auth Core, formerly@particle-network/auth.@particle-network/aa, to assign a SimpleAccount and generate a custom AA-enabled EIP-1193 provider object to control the smart account with Ethers.@particle-network/chains, for configuring Particle Auth Core with an object containing Berachain-specific information, (BerachainArtio).
Then, copy one of the two following commands and execute it at the root of your project to install both SDKs through either Yarn or npm (alternative package managers such as pnpm will follow a similar syntax):
yarn add @particle-network/auth-core-modal @particle-network/chains @particle-network/aa;

# OR (Remember to use either and not both)

npm install @particle-network/auth-core-modal @particle-network/chains @particle-network/aa;


# Expected Output
# added 368 packages, and audited 703 packages in 41s

# 109 packages are looking for funding
#   run `npm fund` for details

# 8 moderate severity vulnerabilities

# To address issues that do not require attention, run:
#   npm audit fix

# Some issues need review, and may require choosing
# a different dependency.

# Run `npm audit` for details.
Getting Keys from Particle Dashboard
Before constructing AuthCoreContextProvider, you'll need three values to initialize Particle Auth Core. When configuring any SDK from Particle Network, whether it's Particle Auth Core, Particle Connect, or Particle's AA SDK, you'll need to retrieve a project ID, client key, and app ID from the Particle dashboard.
These values link your application with your project on the Particle dashboard, therefore authenticating API requests, tracking users, allowing for no-code modal customization, etc.
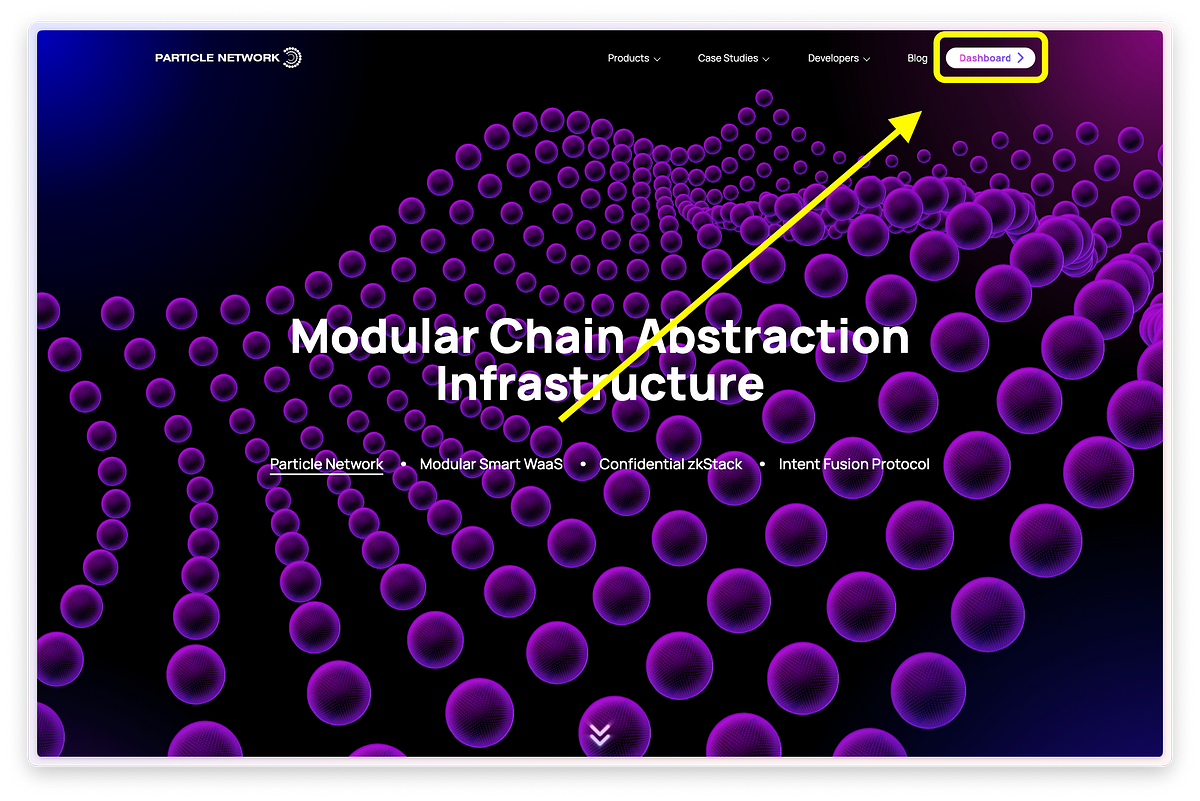
- Head over to particlenetwork.com and then click on “Dashboard” on the top right corner.
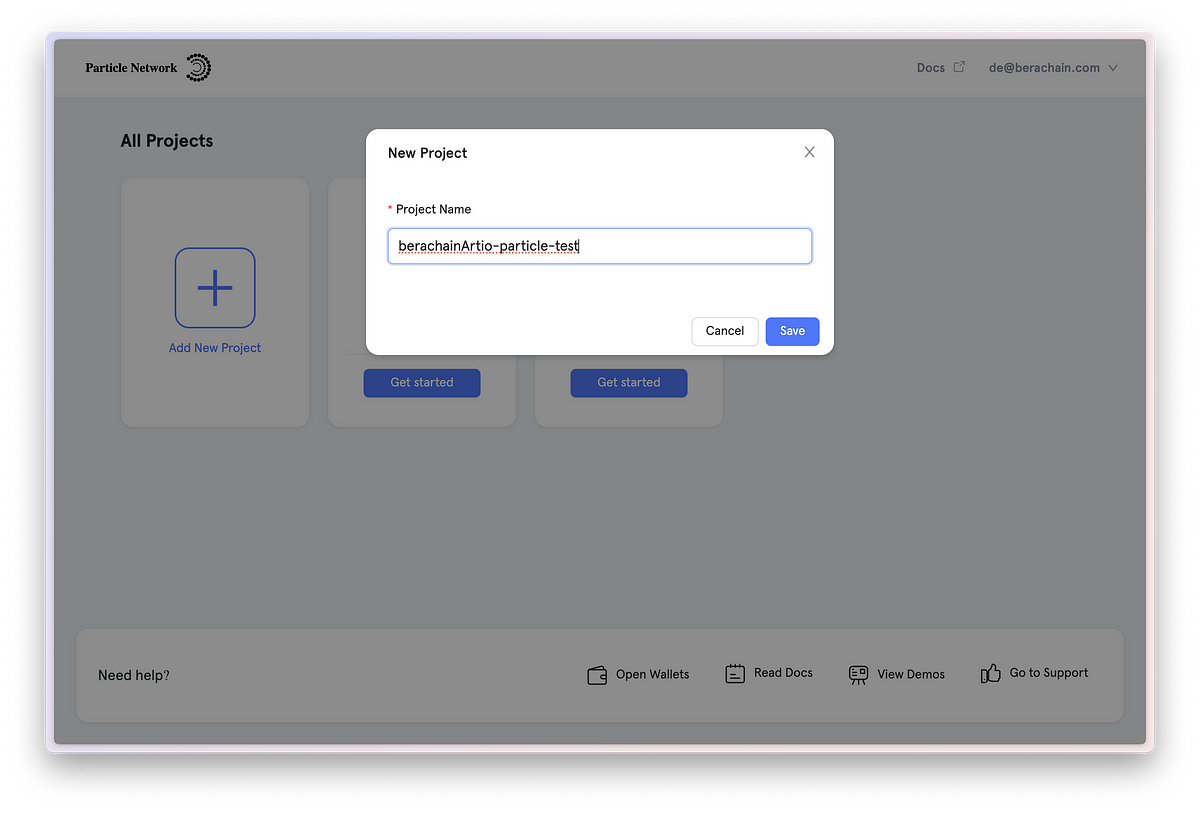
2. Click on “Add New Project” with the Project Name of your choice and click on “Save”.
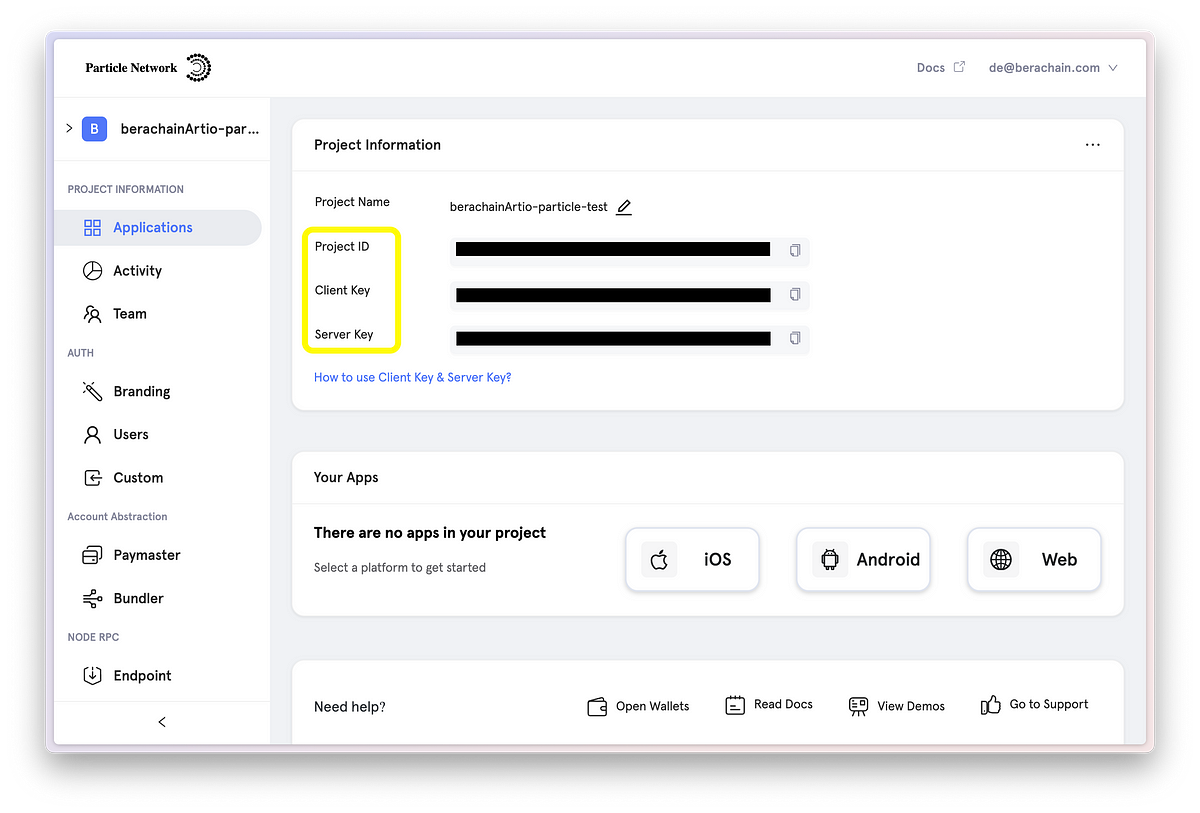
3. You will now have access to “Project ID” and “Client Key”.
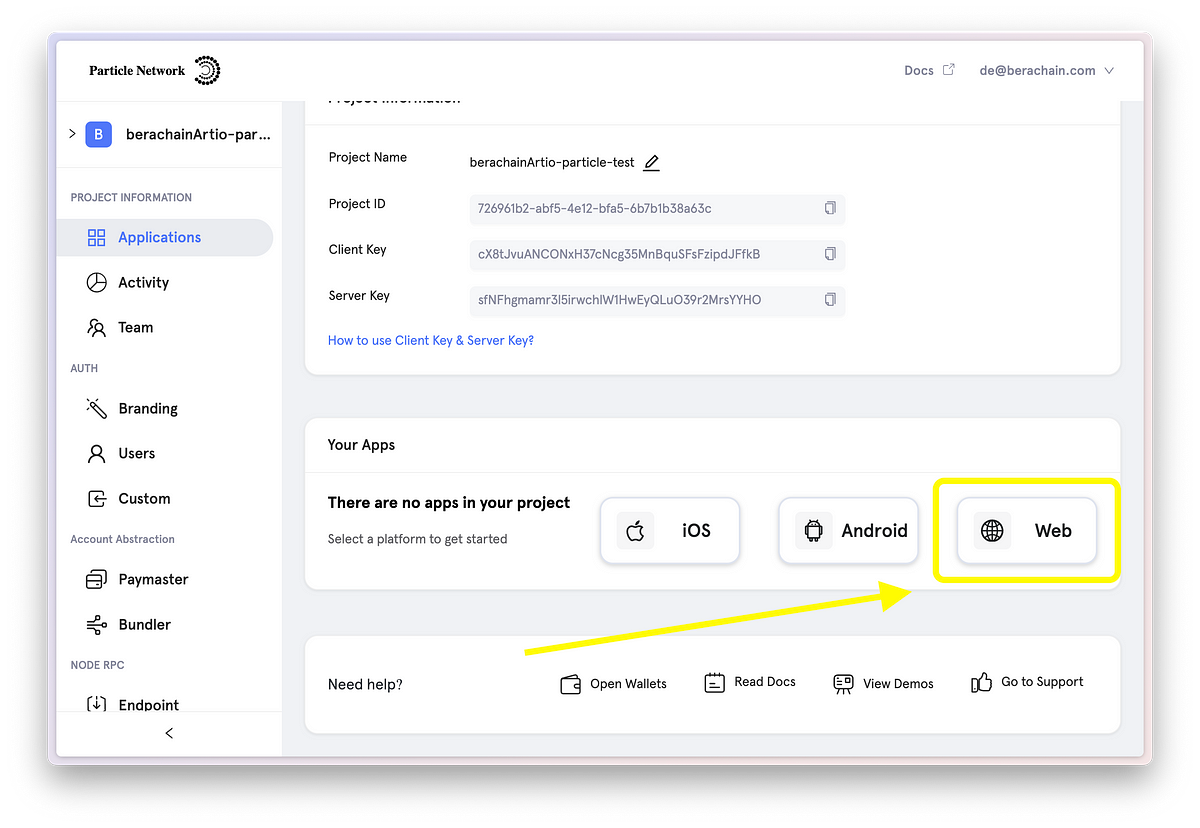
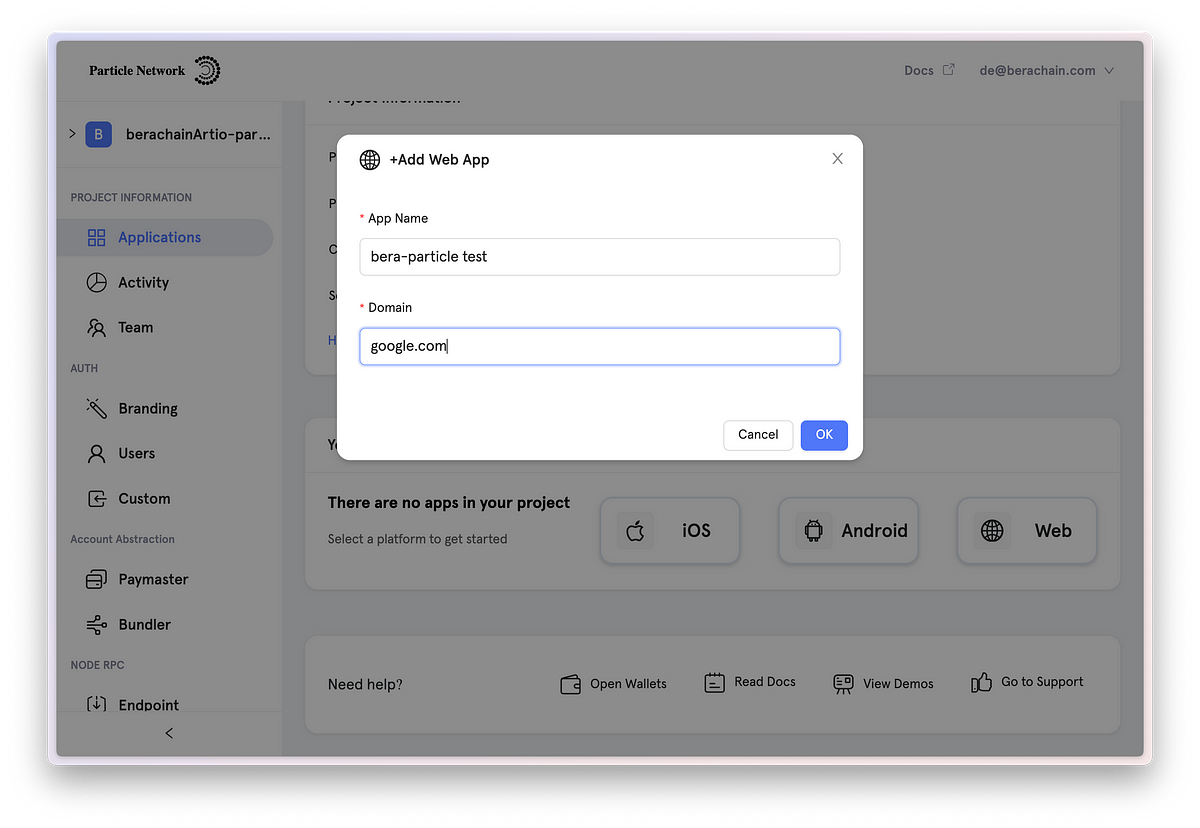
4. For obtaining “App ID” click on “Web” under “Your Apps” tab. And click on “Ok”.
5. Write the name of your choice in your “App Name”. For Domain either you can give “goggle.com” or you can give a domain of your choice where you app is hosted (if hosted already).
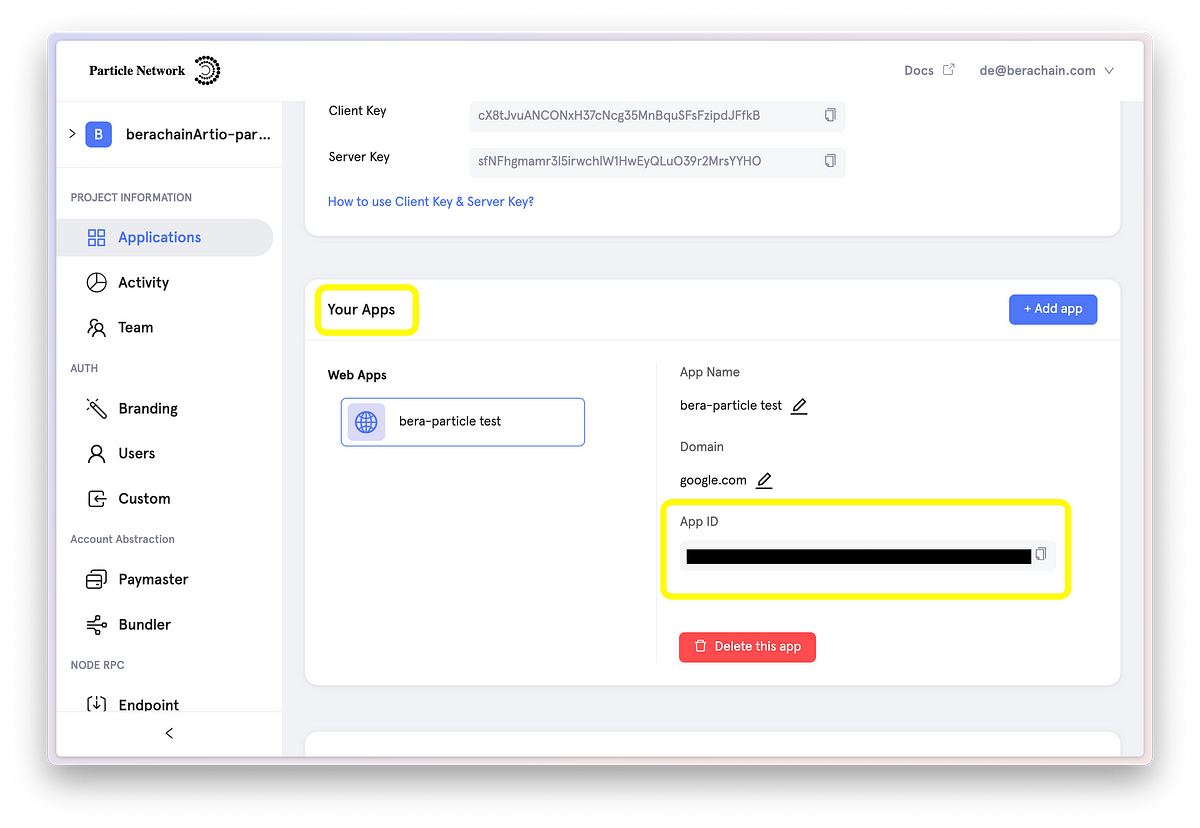
6 . “App ID” should now be visible under “Your Apps” section.
Once these libraries are installed, you’re ready to go through the process of configuration.
Implementing Social Logins through Particle Auth Core:
Particle Auth Core manages configuration through AuthCoreContextProvider (imported from @particle-network/auth-core-modal), an object used within your index file to wrap your primary App component (or its equivalent). This contains key values authenticating your instance of Particle Auth and enabling core customization of the social login or embedded wallet modals.
With a project and application set up through the Particle dashboard, you’re ready to configure AuthCoreContextProvider.
File: ./src/index.tsx
// Imports
// ========================================================
import React from "react";
import ReactDOM from "react-dom/client";
import { BerachainArtio } from "@particle-network/chains";
import { AuthCoreContextProvider } from "@particle-network/auth-core-modal";
import App from "./App";
import("buffer").then(({ Buffer }) => {
window.Buffer = Buffer;
});
ReactDOM.createRoot(document.getElementById("root") as HTMLElement).render(
<React.StrictMode>
<AuthCoreContextProvider
options={{
projectId: process.env.REACT_APP_PROJECT_ID, // Replace YOUR_PROJECT_ID_HERE with the actual project ID
clientKey: process.env.REACT_APP_CLIENT_KEY, // Replace YOUR_CLIENT_KEY_HERE with the actual client key
appId: process.env.REACT_APP_CLIENT_KEY, // Replace YOUR_APP_ID_HERE with the actual app ID
erc4337: {
name: "SIMPLE", //name of the smart account you'd like to be displayed on the modal
version: "1.0.0",
},
wallet: {
visible: true, //boolean dictating whether or not the Particle Wallet modal is shown after login
customStyle: {
supportChains: [BerachainArtio], //an array of chains for the Particle Wallet modal (if visible is true) will be locked to.
},
},
}}
>
<App />
</AuthCoreContextProvider>
</React.StrictMode>
);Note: Due to specific env constraints we’re passing our keys directly as a string and not via the .env file.
Configuring Smart Account
Now that AuthCoreContextProvider has been configured and Particle Auth Core is initialized, you're ready to move onto the implementation of your primary application component (in the example above, this was App).
Before you can begin executing transactions, you'll need to first configure your smart account.
In this setup, Particle Auth Core is used to initiate a social login and generate an EOA. Past that point, Particle's AA SDK (@particle-network/aa) is responsible for assigning and facilitating interaction with a smart account.
An example of the process covered above can be found below.
File: ./src/App.tsx
// Imports
// ========================================================
import { BerachainArtio } from "@particle-network/chains";
import {
  AAWrapProvider,
  SendTransactionMode,
  SmartAccount,
} from "@particle-network/aa";
import {
  useEthereum
} from "@particle-network/auth-core-modal";


 // Import App
// ========================================================
import "./App.css";


const App = () => {
  const { provider } = useEthereum();
  const { connect, disconnect } = useConnect();
  const { userInfo } = useAuthCore();

  const [balance, setBalance] = useState(null);

// Smart Account Config
// ========================================================
  const smartAccount = new SmartAccount(provider, {
    projectId: "YOUR_PROJECT_ID_HERE", // Replace YOUR_PROJECT_ID_HERE with the actual project ID
        clientKey: "YOUR_CLIENT_KEY_HERE", // Replace YOUR_CLIENT_KEY_HERE with the actual client key
        appId: "YOUR_APP_ID_HERE", // Replace YOUR_APP_ID_HERE with the actual app ID
    aaOptions: {
      accountContracts: {
        SIMPLE: [{ chainIds: [BerachainArtio.id], version: '1.0.0' }],
      }
    }
  });
Setting-up Ethers
This instance of SmartAccount in the example above can then be used directly within AAWrapProvider to construct an AA-enabled provider object to use within a new instance of ethers.providers.Web3Provider (or if you're using v6, ethers.BrowserProvider). This same structure can be applied to Web3.js or viem.
We'll use SendTransactionMode.Gasless within AAWrapProvider, ensuring that transactions sent through this provider object will be subject to sponsorship if they pass the conditions we set within the Paymaster (although in this example there are none, so transactions will be sponsored indiscriminately).
Your custom Ethers provider should look like the following:
File: ./src/App.tsx
// Imports
// ========================================================
import { BerachainArtio } from "@particle-network/chains";
import {
  AAWrapProvider,
  SendTransactionMode,
  SmartAccount,
} from "@particle-network/aa";
import {
  useEthereum
} from "@particle-network/auth-core-modal";


 // Import App
// ========================================================
import "./App.css";

const App = () => {
  const { provider } = useEthereum();
  const { connect, disconnect } = useConnect();
  const { userInfo } = useAuthCore();

  const [balance, setBalance] = useState(null);

// Smart Account Config
// ========================================================
  const smartAccount = new SmartAccount(provider, {
    projectId: "YOUR_PROJECT_ID_HERE", // Replace YOUR_PROJECT_ID_HERE with the actual project ID
        clientKey: "YOUR_CLIENT_KEY_HERE", // Replace YOUR_CLIENT_KEY_HERE with the actual client key
        appId: "YOUR_APP_ID_HERE", // Replace YOUR_APP_ID_HERE with the actual app ID
    aaOptions: {
      accountContracts: {
        SIMPLE: [{ chainIds: [BerachainArtio.id], version: '1.0.0' }],
      }
    }
  });


// Ethers Provider Setup
const customProvider = new ethers.providers.Web3Provider(new AAWrapProvider(smartAccount, SendTransactionMode.Gasless), "any");
With this object initialized (customProvider in this case), you'll be able to facilitate transactions, retrieve balances, message signatures, etc. through Particle. However, before being able to facilitate any of these, you’ll first need to facilitate social login — that is what we will be covering next.
Setting-up Social Login
Social login with Particle Auth Core is simple, directed by two functions derived from the useConnect hook, connect and disconnect. Upon calling connect, social login will immediately be initiated and the user will undergo the login process for the specified social login mechanism. Similarly for disconnect, a user will be removed from their account upon calling.
Also, we need to import the specific type SocialAuthType imported from @particle-network/auth-core. (This would in imports).
File: ./src/App.tsx
// Imports
// ========================================================
import { BerachainArtio } from "@particle-network/chains";
import {
AAWrapProvider,
SendTransactionMode,
SmartAccount,
} from "@particle-network/aa";
import {
useEthereum
} from "@particle-network/auth-core-modal";
// New addition of Imports- SocialAuthType
// ========================================================
import { SocialAuthType } from "@particle-network/auth-core";
// Import App
// ========================================================
import "./App.css";
const App = () => {
const { provider } = useEthereum();
const { connect, disconnect } = useConnect();
const { userInfo } = useAuthCore();
const [balance, setBalance] = useState(null);
// Smart Account Config
// ========================================================
const smartAccount = new SmartAccount(provider, {
projectId: "YOUR_PROJECT_ID_HERE", // Replace YOUR_PROJECT_ID_HERE with the actual project ID
clientKey: "YOUR_CLIENT_KEY_HERE", // Replace YOUR_CLIENT_KEY_HERE with the actual client key
appId: "YOUR_APP_ID_HERE", // Replace YOUR_APP_ID_HERE with the actual app ID
aaOptions: {
accountContracts: {
SIMPLE: [{ chainIds: [BerachainArtio.id], version: '1.0.0' }],
}
}
});
// Ethers Provider Setup
const customProvider = new ethers.providers.Web3Provider(new AAWrapProvider(smartAccount, SendTransactionMode.Gasless), "any");
// Login Setup
// ========================================================
const handleLogin = async (authType: SocialAuthType) => { //can be mapped to "Sign in with Google," "Sign in with X," and a miscellaneous button on the frontend by purely changing the string passed into socialType on connect
if (!userInfo) {
await connect({
socialType: authType, //a string dictating the specific authentication type to be used (such as 'google', 'twitter', etc.)
chain: BerachainArtio, //the specific chain you'd like to connect to. This should be BerachainArtio
});
}
};With a custom Ethers object constructed and the user logged in (through connect), transaction requests can be made directly to Particle through its embedded wallet. As mentioned, this will be done directly through methods on the aforementioned Ethers object (customProvider here), which need no special configuration to work with Particle.
Setting up Burn Transaction for BERA
We will be facilitating two transaction for this demo and another transaction for burning 1 $HONEY.
For the first transaction, we’ll be executing a gasless burn of 0.001 $BERA, which essentially involves sending $BERA to a dead address, often 0x000000000000000000000000000000000000dEaD .
This transaction will be quite programmatically simple, following a structure similar to the following:
File: ./src/App.tsx
// Imports
// ========================================================
import { BerachainArtio } from "@particle-network/chains";
import {
AAWrapProvider,
SendTransactionMode,
SmartAccount,
} from "@particle-network/aa";
import {
useEthereum
} from "@particle-network/auth-core-modal";
// New addition of Imports- SocialAuthType
// ========================================================
import { SocialAuthType } from "@particle-network/auth-core";
// Import App
// ========================================================
import "./App.css";
const App = () => {
const { provider } = useEthereum();
const { connect, disconnect } = useConnect();
const { userInfo } = useAuthCore();
const [balance, setBalance] = useState(null);
// Smart Account Config
// ========================================================
const smartAccount = new SmartAccount(provider, {
projectId: "YOUR_PROJECT_ID_HERE", // Replace YOUR_PROJECT_ID_HERE with the actual project ID
clientKey: "YOUR_CLIENT_KEY_HERE", // Replace YOUR_CLIENT_KEY_HERE with the actual client key
appId: "YOUR_APP_ID_HERE", // Replace YOUR_APP_ID_HERE with the actual app ID
aaOptions: {
accountContracts: {
SIMPLE: [{ chainIds: [BerachainArtio.id], version: '1.0.0' }],
}
}
});
// Ethers Provider Setup
const customProvider = new ethers.providers.Web3Provider(new AAWrapProvider(smartAccount, SendTransactionMode.Gasless), "any");
// Login Setup
// ========================================================
const handleLogin = async (authType: SocialAuthType) => { //can be mapped to "Sign in with Google," "Sign in with X," and a miscellaneous button on the frontend by purely changing the string passed into socialType on connect
if (!userInfo) {
await connect({
socialType: authType, //a string dictating the specific authentication type to be used (such as 'google', 'twitter', etc.)
chain: BerachainArtio, //the specific chain you'd like to connect to. This should be BerachainArtio
});
}
};
// Burn 0.001 $BERA
// ========================================================
const executeUserOp = async () => {
const signer = customProvider.getSigner();
const tx = {
to: "0x000000000000000000000000000000000000dEaD",
value: ethers.utils.parseEther("0.001"), //value of the $BERA that will be coverted to which needs to be converted to wei through
};
const txResponse = await signer.sendTransaction(tx); //sendTransaction method
const txReceipt = await txResponse.wait();
notification.success({
message: "Transaction Successful",
description: (
<div>
Transaction Hash:{" "}
<a
href={`https://artio.beratrail.io/tx/${txReceipt.transactionHash}`}
target="_blank"
rel="noopener noreferrer"
>
{txReceipt.transactionHash}
</a>
</div>
),
});
};Setting up Burn Transaction for $HONEY
Note: If you don’t have $HONEY, but would like some to test this function, Berachain has a native DEX that supports swapping $BERA for $HONEY.
As for the second transaction, the burn of 1 $HONEY, Berachain’s native stablecoin, we can take a similar approach, although instead of calling a method on signer directly, we'll have to create a contract object for $HONEY, on which we can call the transfer method.
This can be done by simply initiating ethers.Contract, passing in 0x7EeCA4205fF31f947EdBd49195a7A88E6A91161B (the $HONEY contract address on Berachain Artio), alongside the ABI. (https://artio.beratrail.io/token/0x7EeCA4205fF31f947EdBd49195a7A88E6A91161B)
File: ./src/App.tsx
// Imports
// ========================================================
import { BerachainArtio } from "@particle-network/chains";
import {
AAWrapProvider,
SendTransactionMode,
SmartAccount,
} from "@particle-network/aa";
import {
useEthereum
} from "@particle-network/auth-core-modal";
// New addition of Imports- SocialAuthType
// ========================================================
import { SocialAuthType } from "@particle-network/auth-core";
// Import App
// ========================================================
import "./App.css";
const App = () => {
const { provider } = useEthereum();
const { connect, disconnect } = useConnect();
const { userInfo } = useAuthCore();
const [balance, setBalance] = useState(null);
// Smart Account Config
// ========================================================
const smartAccount = new SmartAccount(provider, {
projectId: "YOUR_PROJECT_ID_HERE", // Replace YOUR_PROJECT_ID_HERE with the actual project ID
clientKey: "YOUR_CLIENT_KEY_HERE", // Replace YOUR_CLIENT_KEY_HERE with the actual client key
appId: "YOUR_APP_ID_HERE", // Replace YOUR_APP_ID_HERE with the actual app ID
aaOptions: {
accountContracts: {
SIMPLE: [{ chainIds: [BerachainArtio.id], version: '1.0.0' }],
}
}
});
// Ethers Provider Setup
const customProvider = new ethers.providers.Web3Provider(new AAWrapProvider(smartAccount, SendTransactionMode.Gasless), "any");
// Login Setup
// ========================================================
const handleLogin = async (authType: SocialAuthType) => { //can be mapped to "Sign in with Google," "Sign in with X," and a miscellaneous button on the frontend by purely changing the string passed into socialType on connect
if (!userInfo) {
await connect({
socialType: authType, //a string dictating the specific authentication type to be used (such as 'google', 'twitter', etc.)
chain: BerachainArtio, //the specific chain you'd like to connect to. This should be BerachainArtio
});
}
};
// Burn 0.001 $BERA
// ========================================================
const executeUserOp = async () => {
const signer = customProvider.getSigner();
const tx = {
to: "0x000000000000000000000000000000000000dEaD",
value: ethers.utils.parseEther("0.001"), //value of the $BERA that will be coverted to which needs to be converted to wei through
};
const txResponse = await signer.sendTransaction(tx); //sendTransaction method
const txReceipt = await txResponse.wait();
notification.success({
message: "Transaction Successful",
description: (
<div>
Transaction Hash:{" "}
<a
href={`https://artio.beratrail.io/tx/${txReceipt.transactionHash}`}
target="_blank"
rel="noopener noreferrer"
>
{txReceipt.transactionHash}
</a>
</div>
),
});
};
// Burn 1 $HONEY
// ========================================================
const executeUserOpHONEY = async () => {
const signer = customProvider.getSigner();
const tokenContract = new ethers.Contract(
"0x7EeCA4205fF31f947EdBd49195a7A88E6A91161B", //official $HONEY contract address
["function transfer(address to, uint256 amount)"],
signer //retrieved through {your ethers object}.getSigner
);
const txResponse = await tokenContract.transfer(
"0x000000000000000000000000000000000000dEaD",
ethers.utils.parseEther("1") // value of the $HONEY
);
const txReceipt = await txResponse.wait();
notification.success({
message: "Transaction Successful",
description: (
<div>
Transaction Hash:{" "}
<a
href={`https://artio.beratrail.io/tx/${txReceipt.transactionHash}`}
target="_blank"
rel="noopener noreferrer"
>
{txReceipt.transactionHash}
</a>
</div>
),
});
};If you’re leveraging the built-in Particle Wallet interface (shown by setting visible to true within AuthCoreContextProvider), many ERC-20 and ERC-721 tokens won’t be automatically picked up (including $HONEY). If these aren’t automatically reflected within the modal, you’ll need to manually add the token through the plus icon near the list of balances.
For the complete App.tsx code, please refer the “Complete Code” section right below “Recap”.
dApp CSS
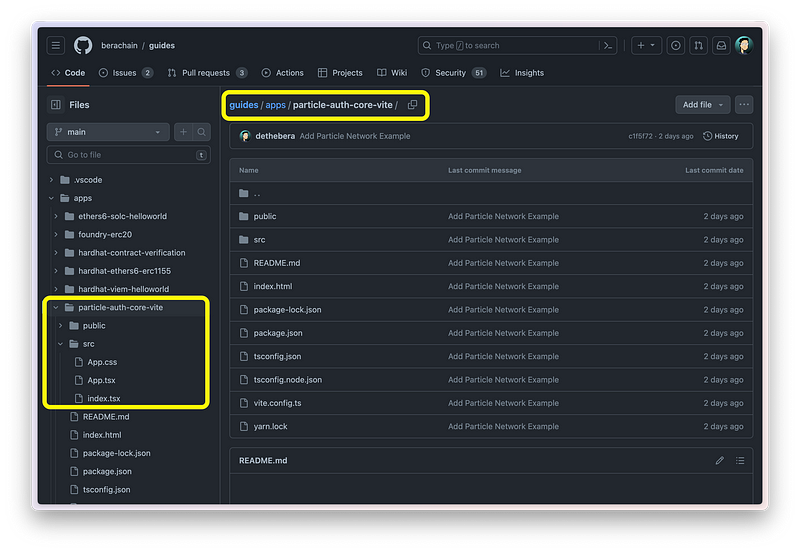
As mentioned before, we would be focusing mostly on backend and getting the dApp running. Follow the link below and add the css code to your existing ../src/App.css.
../src/App.css
Head over to https://github.com/berachain/guides/tree/main/apps/particle-auth-core-vite and use the existing code from the template!
✅ Deploying the dApp
npm run dev;
#Expected Output:
> vite-project@0.0.0 dev
> vite
VITE v5.1.3 ready in 117 ms
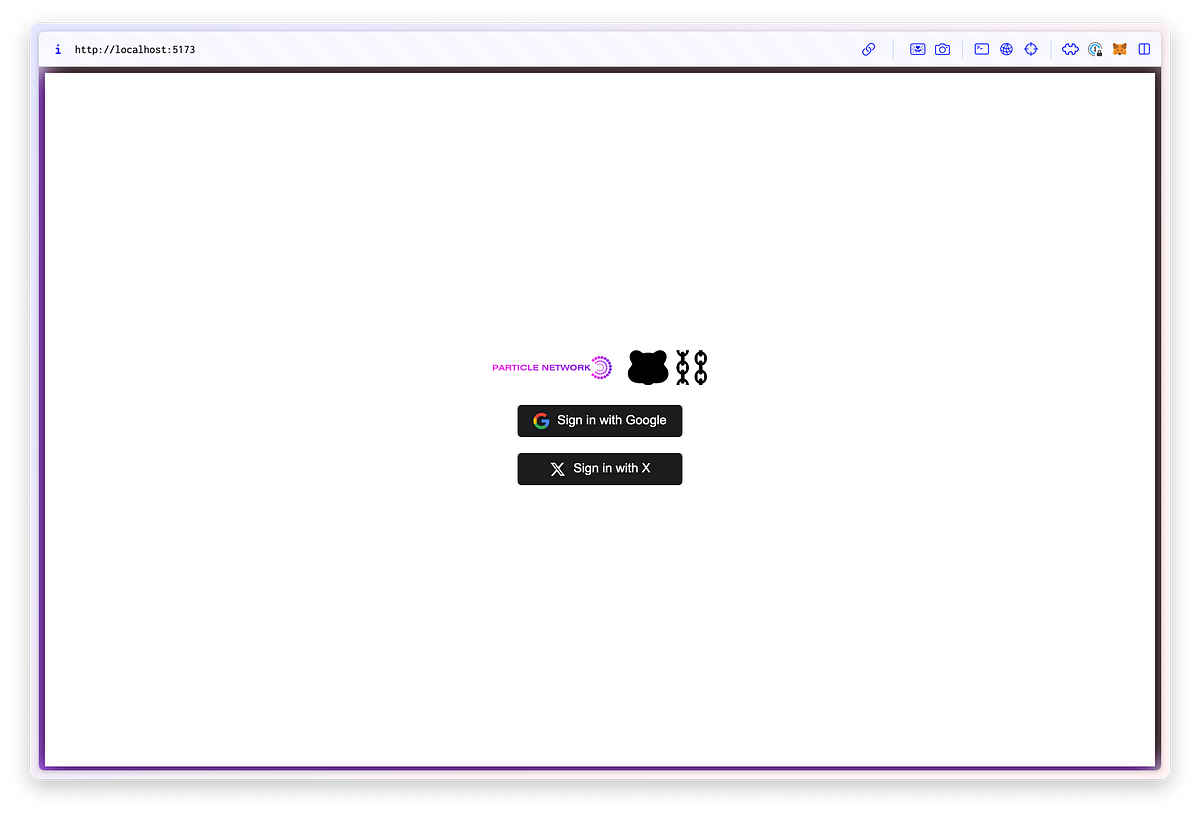
➜ Local: http://localhost:5173/
➜ Network: use --host to expose
➜ press h + enter to show helpdApp should be successfully deployed on http://localhost:5173/.
Recap
Here’s a quick break-down of the steps that were performed in this guide!
- Setting up your dev environment and install the required libraries.
- Getting keys from particle dashboard
- Configuring Smart Account
- Setting-up Ethers
- Setting-up Social Login
- Setting up Burn Transaction for $BERA and $HONEY
- Deploying and Testing the dApp!
This guide serves as a one-stop solution for new dApps looking to integrate a wallet that facilitates social-based login along with added AA support! structure and flow similar to the above can be applied directly to both existing and new applications.
Complete Code
../src/index.tsx
import React from "react";
import ReactDOM from "react-dom/client";
import { BerachainArtio } from "@particle-network/chains";
import { AuthCoreContextProvider } from "@particle-network/auth-core-modal";
import App from "./App";

import("buffer").then(({ Buffer }) => {
  window.Buffer = Buffer;
});

ReactDOM.createRoot(document.getElementById("root") as HTMLElement).render(
  <React.StrictMode>
    <AuthCoreContextProvider
      options={{
        projectId: "YOUR_PROJECT_ID_HERE", // Replace YOUR_PROJECT_ID_HERE with the actual project ID
        clientKey: "YOUR_CLIENT_KEY_HERE", // Replace YOUR_CLIENT_KEY_HERE with the actual client key
        appId: "YOUR_APP_ID_HERE", // Replace YOUR_APP_ID_HERE with the actual app ID
        erc4337: {
          name: "SIMPLE",
          version: "1.0.0",
        },
        wallet: {
          visible: true,
          customStyle: {
            supportChains: [BerachainArtio],
          },
        },
      }}
    >
      <App />
    </AuthCoreContextProvider>
  </React.StrictMode>
);
../src/App.tsx
import React, { useState, useEffect } from "react";
import { BerachainArtio } from "@particle-network/chains";
import {
  AAWrapProvider,
  SendTransactionMode,
  SmartAccount,
} from "@particle-network/aa";
import {
  useEthereum,
  useConnect,
  useAuthCore,
} from "@particle-network/auth-core-modal";
import { ethers } from "ethers";
import { Modal, notification } from "antd";

import "./App.css";

import { SocialAuthType } from "@particle-network/auth-core";

const App = () => {
  const { provider } = useEthereum();
  const { connect, disconnect } = useConnect();
  const { userInfo } = useAuthCore();

   const smartAccount = new SmartAccount(provider, {
    projectId: "YOUR_PROJECT_ID_HERE", // Replace YOUR_PROJECT_ID_HERE with the actual project ID
        clientKey: "YOUR_CLIENT_KEY_HERE", // Replace YOUR_CLIENT_KEY_HERE with the actual client key
        appId: "YOUR_APP_ID_HERE", // Replace YOUR_APP_ID_HERE with the actual app ID
    aaOptions: {
      accountContracts: {
        SIMPLE: [{ chainIds: [BerachainArtio.id], version: '1.0.0' }],
      }
    }
  });

  const customProvider = new ethers.providers.Web3Provider(
    new AAWrapProvider(smartAccount, SendTransactionMode.Gasless),
    "any"
  );

  useEffect(() => {
    if (userInfo) {
      fetchBalance();
    }
  }, [userInfo]);

  const [balance, setBalance] = useState<string | null>(null);

  const fetchBalance = async () => {
    const address = await smartAccount.getAddress();
    const balanceResponse = await customProvider.getBalance(address);
    setBalance(ethers.utils.formatEther(balanceResponse));
  };

  const handleLogin = async (authType: SocialAuthType) => {
    if (!userInfo) {
      await connect({
        socialType: authType,
        chain: BerachainArtio,
      });
    }
  };

  const executeUserOp = async () => {
    const signer = customProvider.getSigner();

    const tx = {
      to: "0x000000000000000000000000000000000000dEaD",
      value: ethers.utils.parseEther("0.001"),
    };

    const txResponse = await signer.sendTransaction(tx);
    const txReceipt = await txResponse.wait();

    notification.success({
      message: "Transaction Successful",
      description: (
        <div>
          Transaction Hash:{" "}
          <a
            href={`https://artio.beratrail.io/tx/${txReceipt.transactionHash}`}
            target="_blank"
            rel="noopener noreferrer"
          >
            {txReceipt.transactionHash}
          </a>
        </div>
      ),
    });
  };

  const executeUserOpHONEY = async () => {
    const signer = customProvider.getSigner();

    const tokenContract = new ethers.Contract(
      "0x7EeCA4205fF31f947EdBd49195a7A88E6A91161B",
      ["function transfer(address to, uint256 amount)"],
      signer
    );

    const txResponse = await tokenContract.transfer(
      "0x000000000000000000000000000000000000dEaD",
      ethers.utils.parseEther("1")
    );
    const txReceipt = await txResponse.wait();

    notification.success({
      message: "Transaction Successful",
      description: (
        <div>
          Transaction Hash:{" "}
          <a
            href={`https://artio.beratrail.io/tx/${txReceipt.transactionHash}`}
            target="_blank"
            rel="noopener noreferrer"
          >
            {txReceipt.transactionHash}
          </a>
        </div>
      ),
    });
  };

  return (
    <div className="App">
      <div className="logo-section">
        <img
          src="https://i.imgur.com/EerK7MS.png"
          alt="Logo 1"
          className="logo logo-big"
        />
        <img
          src="https://i.imgur.com/OdR3YLW.png"
          alt="Logo 2"
          className="logo"
        />
      </div>
      {!userInfo ? (
        <div className="login-section">
          <button
            className="sign-button google-button"
            onClick={() => handleLogin("google")}
          >
            <img
              src="https://i.imgur.com/nIN9P4A.png"
              alt="Google"
              className="icon"
            />
            Sign in with Google
          </button>
          <button
            className="sign-button twitter-button"
            onClick={() => handleLogin("twitter")}
          >
            <img
              src="https://i.imgur.com/afIaQJC.png"
              alt="Twitter"
              className="icon"
            />
            Sign in with X
          </button>
        </div>
      ) : (
        <div className="profile-card">
          <h2>{userInfo.name}</h2>
          <div className="balance-section">
            <small>{balance} BERA</small>
            <button className="sign-message-button" onClick={executeUserOp}>
              Burn 0.001 $BERA
            </button>
            <button
              className="sign-message-button honey"
              onClick={executeUserOpHONEY}
            >
              Burn 1 $HONEY
            </button>
            <button className="disconnect-button" onClick={() => disconnect()}>
              Logout
            </button>
          </div>
        </div>
      )}
    </div>
  );
};

export default App;
../src/App.css
Head over to https://github.com/berachain/guides/tree/main/apps/particle-auth-core-vite and use the existing code from the template!
More dApps and How To Get Support ?
If you’re interested in understanding and developing more on Berachain, try various example repos provided in the official guides repo —

Berachain’s developer documentation also has multiple starter guides with goto tools such as Hardhat, Foundry and more! Head over to developer section on the docs using the link below.

How to get Developer Support?
⚠️ Still facing issues or have doubts? Head over to Official Berachain Discord and raise a ticket as shown in the gif below!
Our DevRel team will be happy to assist! 🤝
Byyeeee dev bears! 🐻


